
How to update EasyOS
Page created June 18, 2022. Instructions
are for EasyOS 4.1 or greater.
Page updated June 27, 2022. Instructions are for EasyOS 4.2.2 or
greater.
Page updated August 15, 2022
A significant feature of EasyOS is the ease of updating to new
versions, and rollback to older versions and snapshots, and
roll-forward again.
![]()
A great thing about EasyOS is that updating is an "atomic"
operation: there are just three files required to upgrade;
'vmlinuz', 'initrd' and 'easy.sfs'. Replace those with the latest,
and version update is done. That, essentially, is what "update"
does.
That's updating, but you can also roll-back to an earlier version
or snapshot. Read about that here:
https://easyos.org/user/easy-version-upgrade-and-downgrade.html
Tutorial finished. The rest of this web-page is just extra
information that you might find handy to know...
Update script
The "update" icon runs a script, an application with a text-mode
interface. Here is the first window:
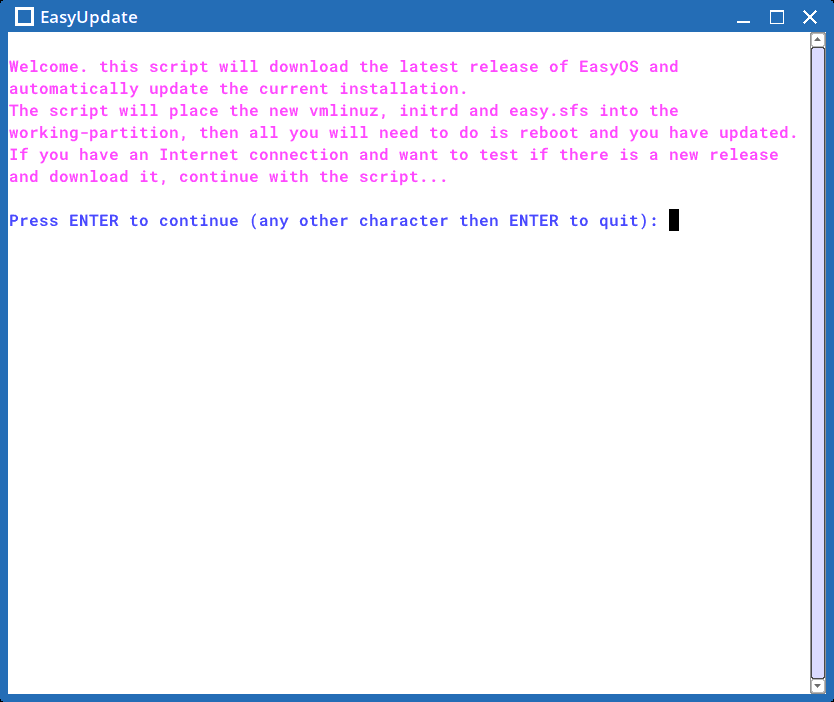
...the pink text summarizes what is going to happen. After
pressing the ENTER key:
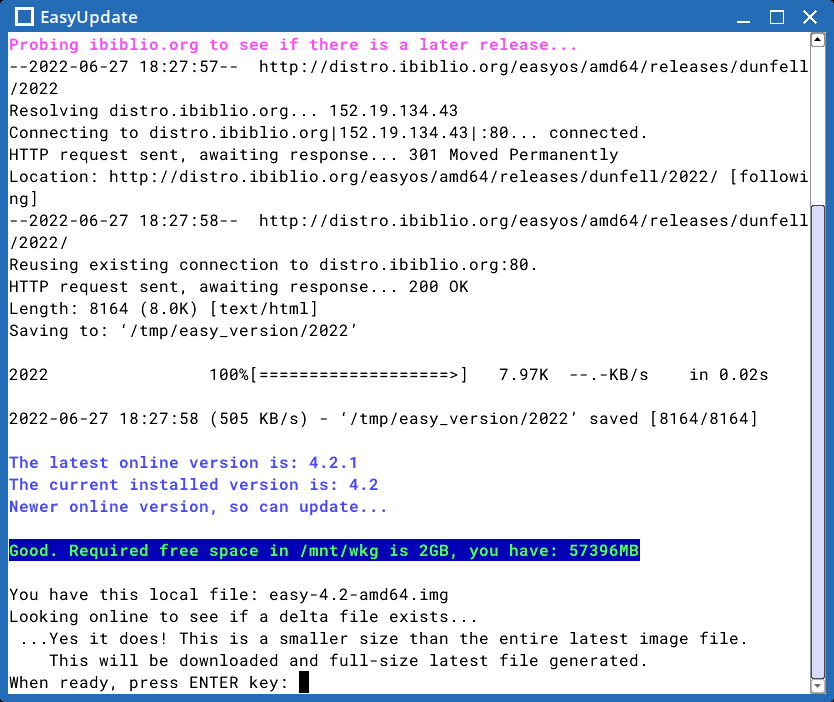
...the script has probed online and determined there is a later
version, 4.2.1. If there wasn't, the script would have terminated.
Note the reference above to a "delta file". This is also known as
a "difference file". If you have kept the previous image file, in
this case 'easy-4.2-amd64.img", the update script looks to see if
there is a difference-file online. This is a small file that only
has the differences between 4.2 and 4.2.1.
Normally there would be a difference-file online, but if there
isn't, then the full 'easy-4.2.1-amd64.img' file would be
downloaded, a whopping 825MiB. Compare that with the 4.2-to-4.2.1
difference file at only 338KiB.
What is going to happen, is the difference-file will be
downloaded, then it will be combined with 'easy-4.2-amd64.img' and
will create 'easy-4.2.1-amd64.img', the full-size latest version.
Press the ENTER key again:
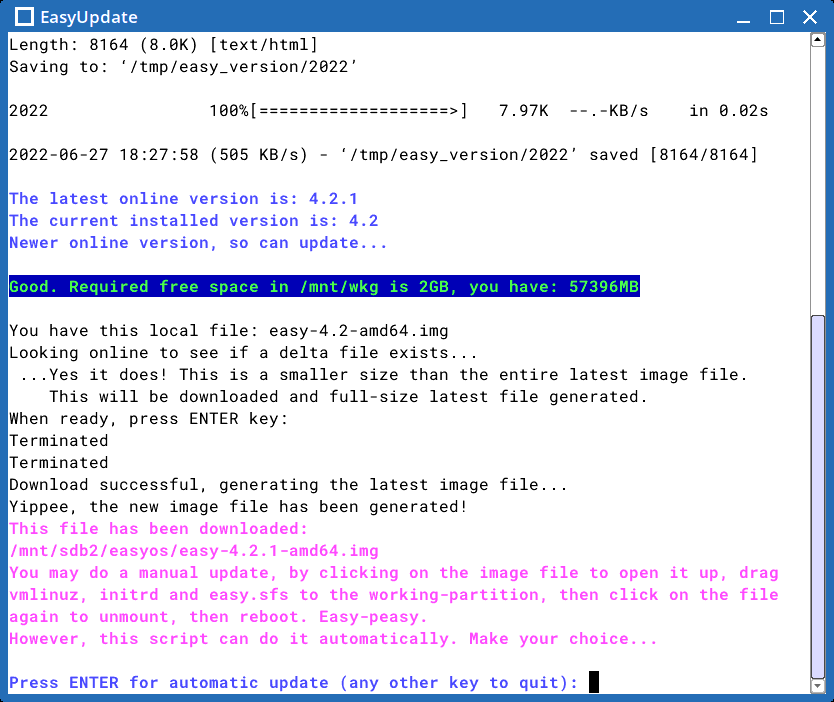
Yes, as the pink text says, it is "easy peasy" to perform a
manual update. That is described further down this page.
Press ENTER for automatic update:
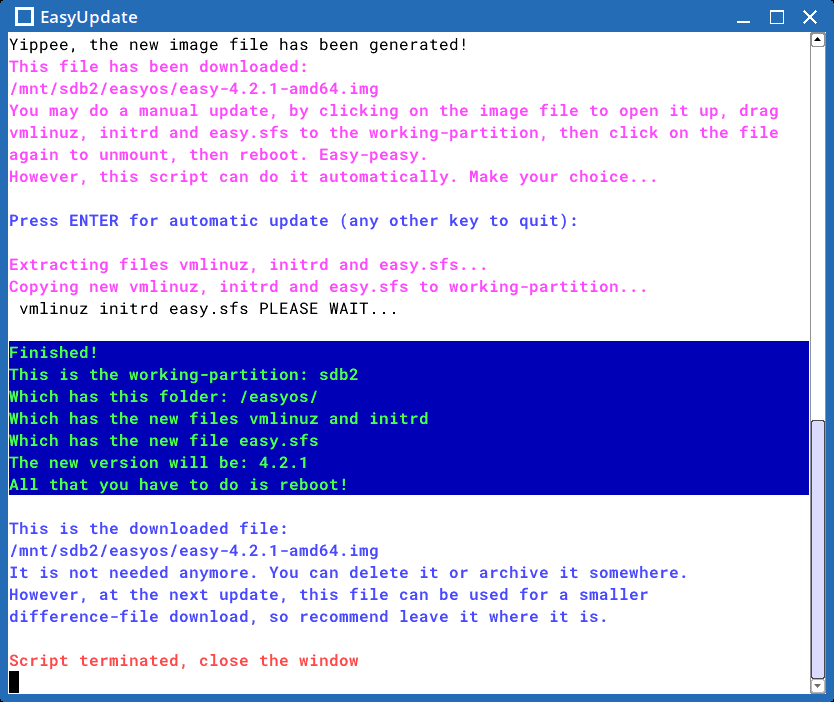
The update has been completed, and all that you need to do is reboot.A useful bit of information:
/mnt/wkg is a symlink to the working-directory in the working-partition, in this case /mnt/sdb2/easyos
Note though, the downloaded file 'easy-4.2.1-amd64.img'. You
could delete it; however, it is strongly recommended to leave it
there, as it will be used at the next update, so only a small
difference-file will be downloaded.
If you want to update the only-very-slightly-harder way, or just
want to understand in more detail what is going on, read below...
Manual updating
The online image file, for example 'easy-4.2.1-amd64.img', has
three files inside it, that are required to update an existing
installation of EasyOS. The image file is 825MiB and is formatted
like this:
| Gap 1MiB |
Boot-partition 7miB fat12 |
Working-partition 816MiB ext4 |
Easy has a script, 'mount-img', that can be used to open up the
image file:
# mount-img easy-4.2.1-amd64.img
...or, just clicking on the file will run 'mount-img'.
And two windows will popup. The boot-partition:
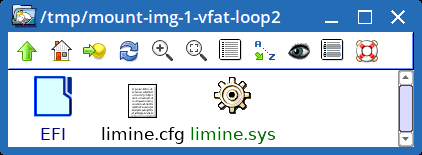
The 7MiB fat12 partition is the boot-partition. It has the Limine
bootloader. This will boot on both legacy-BIOS and UEFI computers.
The working-partition:
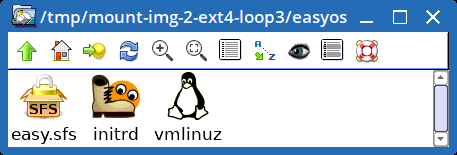
What you have to do is drag those three files, 'vmlinuz',
'initrd' and 'easy.sfs', into the existing installation. Here is
the case of the EasyOS installation in sdb2/easyos:
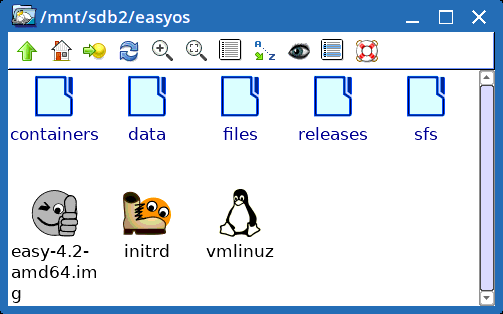
After having drag-and-dropped those three files, don't forget to
unmount the partitions in 'easy-4.2.1-amd64.img'. This can be done
simply by clicking on it a second time, or you can do it in a
terminal:
# mount-img
This description is not just for Easy on a USB flash-stick. The
above picture could be a "frugal" install of Easy in an internal
drive partition. It is the same principle; drag-and-drop the three
files.
You can see why the words "easy peasy" are used. Reboot and you
have updated.
Manual updating the hard way
Download the latest image file, say 'easy-4.2.1-amd64.img'. Run
'fdisk' to view the partitions:
# fdisk -l easy-4.2.1-amd64.imgThe second partition is what you need. Multiple by 512 to convert to bytes:
...
Device Boot Start End Sectors Size Id Type
easy-4.2.1-amd64.img1 * 2048 16383 14336 7M ef EFI (FAT-12/16/32)
easy-4.2.1-amd64.img2 16384 1687551 1671168 816M 83 Linux
# echo $((16384*512))
8388608
Now mount the second partition:
# LOOP2="$(losetup -f)"
# losetup -r -o 8388608 $LOOP2 easy-4.2.1-amd64.img
# mkdir -p mntpt2
# mount -t ext4 $LOOP2 mntpt2
...that's it, the second partition has been mounted, and you can
now copy 'vmlinuz', 'initrd' and 'easy.sfs' out from 'mntpt2'.
One thing to remember, after having copied them out, unmount the
partition:
# sync
# umount mntpt2
# losetup -d $LOOP2
Have fun!
Postamble
Some extra thoughts...
EasyOS underwent major structural changes in 4.1, 4.2 and 4.2.1, and the "update" icon on the desktop does not work prior to 4.2.2. Going further back, EasyOS did not even have an "update" icon.
However, it is still possible to update an old installation of Easy. It requires manual steps, that are described in this forum post:
https://forum.puppylinux.com/viewtopic.php?p=64166#p64166
Tags: user