
Prepare your computer for booting Linux
Page updated: 22 Jan 2019, 1 Sept. 2019
The end-goal is to explain how to install EasyOS on your desktop PC or laptop, alongside Windows or other Linux distributions, which is known as "dual booting". However, at the very beginning, you have a computer with Windows installed, and there are some basic steps to take to prepare it for dual-booting. That's what this page is about. In other words, read this page FIRST.
The Author (Barry Kauler) purchased a mini-PC, a Mele PCG35 Apo, in September 2017. Very inexpensive at just US$179 including international postage (in Australian dollars, Barry paid about $235). Quite fast CPU, excellent specs, Win10, passively-cooled. Here is a photo:
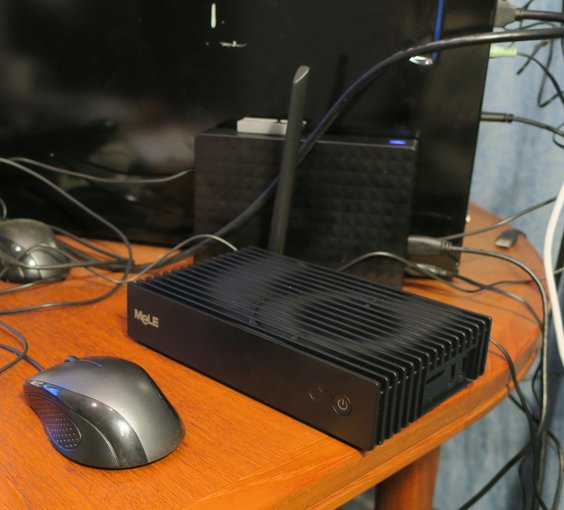
...dwarfed by the mid-tower PC!
A brand-new system, it will make a good case-study for this first tutorial.
Pre-2012 or post-2012 computer
First step, you need to know whether you have a "pre 2012" PC or a later one. These are x86 Windows PCs, that usually come with Microsoft Windows pre-installed. These are the vast majority that you buy in computer shops -- the "others" are mostly Apple computers or Chromebooks.
Desktop PCs and laptops, of the "x86 Windows" variety, use one of
two types of firmware: BIOS or UEFI.
All PCs manufactured prior to 2012 are of the former kind, and
these were usually sold with Windows 98, XP, Vista or 7.
From 2012, most PCs came with Windows 8.x installed, and these all
have UEFI firmware. Now of course, we have Windows 10 PCs, also
with UEFI firmware.
A nit-picking note: technically, UEFI is a later variety of BIOS,
so it still a BIOS, however, to avoid confusion the Author just calls the
new variety "UEFI".
Firmware
Firmware is the name of application code and data that is stored permanently in ROM (Read Only Memory). This is a program that is permanently in your computer.
At power-on, the BIOS or UEFI firmware is automatically executed, and this performs various startup operations. One of those operations is to detect where the operating system is and start that.
Many people who have PC experience will know that by pressing a certain key at power-on, the BIOS-Setup would run, which allowed various start-up options to be customized. For example, to turn on or off the ability to boot an operating system from USB or CD.
Most commonly, that special key is ESC, F2 or DEL.
UEFI firmware also has UEFI-Setup, also invoked by ESC, F2 or DEL, however, Windows 8.x (and 10) may have disabled this feature. To enable these hot-keys, you have to turn off a feature of Windows called Fast Startup.
What this web page is really about
Hit the "pause" button. Before describing how to turn off Fast Startup, you need to have a clearer picture of where we are headed.
if you have a PC with BIOS, no need to worry about Fast Startup, you should be good-to-go. If you know what that hot-key is, you can invoke the BIOS-setup when the computer starts. Then you have the option of choosing an external drive, such as USB-stick or CD, with Linux installed on it, and therefore boot Linux.
Thus, you have already achieved dual-booting. In future, just plug-in the USB-stick or CD before powering-on, and Linux will run. Otherwise, Windows will run.
Ditto with UEFI PCs. After you have fixed that Fast Startup road-block and another thing called Secure Boot, you will be able to do the same thing.
However, there is another option: you can install Linux on the internal hard drive of the PC, and have dual-booting of Windows and Linux.
So, the rest of this page elaborates on the details to boot Linux
from an external USB-stick or CD, and prepares the way for
dual-booting an internally-installed Linux. Read on...
How to turn off Fast Startup
If your PC has Windows 8.x, click the menu at bottom-left of screen, choose Control Panel. Then, follow these links:"System and Security"
"Power Options"
"Choose what the power buttons do"
Then, you will see this window:
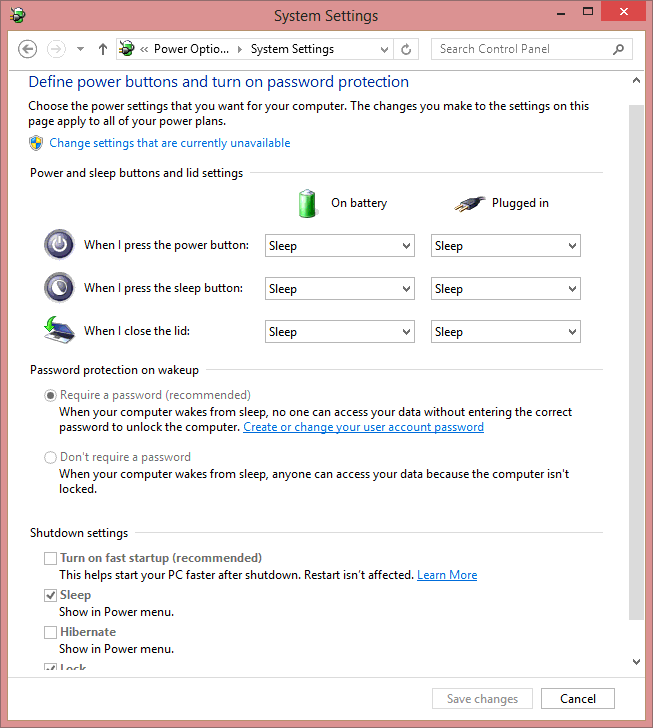
Untick "Turn on fast startup", then click the "Save changes" button.
With Windows 10, the window pictured above looks much the same, but the Author followed a different path to get there. Click the menu button at lower-left of screen, then follow these links:
Settings -> System -> Power & sleep
    "Additional power settings"
        "Choose what the power buttons do"
        "Change settings that are currently unavailable"
This is a snapshot of the window, running the Mele PCG35:
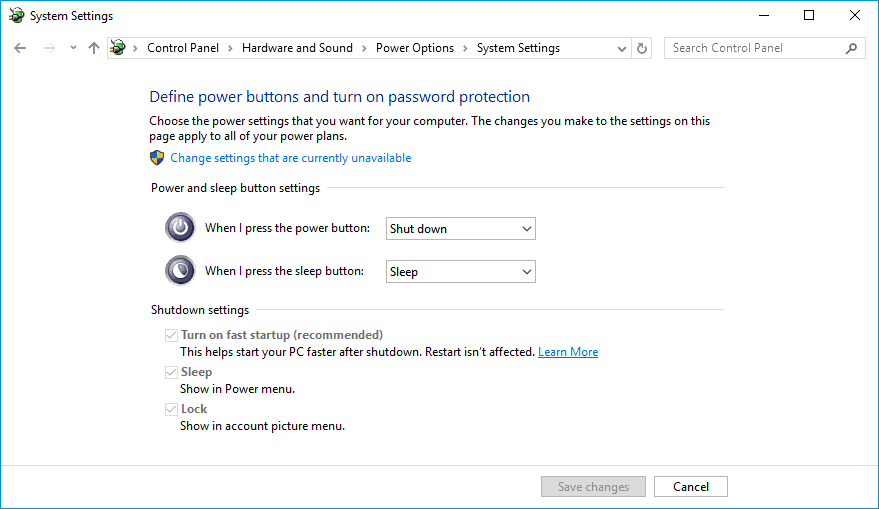
That's it, next time that you power-on the PC, press ESC, F2 or DEL and the UEFI-Setup will launch. Now, there are a couple of things to do in the UEFI-Setup...
Launching UEFI-Setup
Depending on your PC, you have to press the "hot key" F2, DEL, or on some PCs the ESC key.Note however, Windows 8.x and 10 have an alternative way of launching the UEFI-Setup, that is, an alternative to using the hot-key at power-on. Here is how:
Right-click the menu at bottom-left of screen...Your PC will then reboot and the UEFI-Setup will start. Rather a lot of steps, but there you go, just in case you can't use the hot key, for whatever reason.
"Shut down or sign out"
HOLD DOWN THE SHIFT KEY, click on "Restart" in menu
"Troubleshoot"
"Advanced options"
"UEFI Firmware Settings"
CLICK THE "Restart" button
Having brought up UEFI-Setup, number one thing to do is turn off Secure Boot...
How to turn off Secure Boot
Secure Boot is something that needs to be turned off. In a nutshell, Secure Boot prevents other operating systems from booting, unless they have a special code (issued by Microsoft).
Why should you be prevented from booting other operating systems on your own computer?
Secure
Boot is a setting in the UEFI-Setup. It is just a matter of turning it
off. The Author's Mele PCG35 however, does not even have the Secure Boot option,
meaning that it is permanently "off".
When you are poking around in the UEFI-Setup, you might find something else, called Legacy Boot. Don't worry about this, leave it "off". The Mele PCG35 doesn't have that option either.
If your UEFI-Setup does have the Secure Boot option, you must turn it off. There is no standard layout to the user interface in UEFI-Setup. So, a snapshot is of limited use. However, you should see something like this:
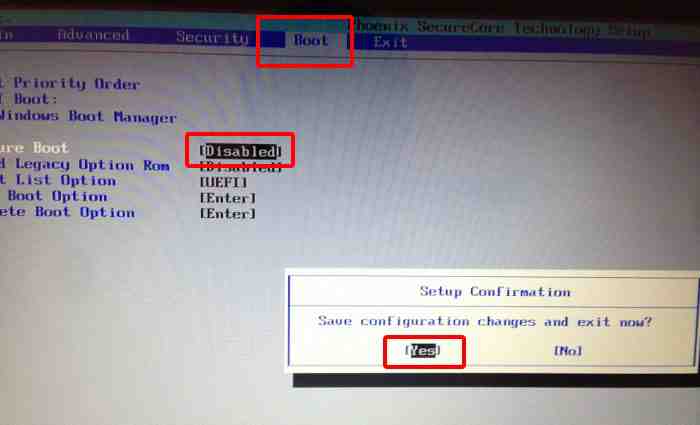
What you have to do is find the Secure Boot setting, and if possible, set it to Disabled. This option is usually in either the Security tab, the Boot tab, or the Authentication tab.
The above are the basic steps, but if you want more explanation with lots of nice pictures, go here: http://itsfoss.com/disable-uefi-secure-boot-in-windows-8/
...covers some differences between Windows 8 and 8.1.
Another
thing to be on the lookout for, is that there may be a "Fast Boot"
setting in the UEFI-Setup. Make sure that is also "off".
Once again, the Mele makes life easy, it doesn't have that option.
Now you are ready to boot Linux from an external drive. Restart the PC, with the external drive plugged-in, and holding down the hot-key -- for the Mele, it is the ESC key. The BIOS-Setup or UEFI-Setup will launch, the external drive can be selected.
Of course, this is assuming that you have Linux in an external drive. If you need a Linux to play with, try Easy Linux. You will find an introduction to Easy here:
And instructions to write it to a USB-stick:
https://easyos.org/install/how-to-write-easyos-to-a-flash-drive.html
What follows are further details on choosing what drive to boot...
How to enable booting from USB drive
Now, you need to tell the UEFI-Setup (or BIOS-Setup) to recognise and boot from your USB stick.
You must have the USB stick plugged in before powering-on and running UEFI-Setup.
Beware USB-adaptor cards
An older PC may have extra USB ports provided by a PCI or PCIe adaptor card. Typically, the motherboard only has USB2 ports and an adaptor provides USB3 ports. Unfortunately, in the majority of cases, these extra USB ports cannot be booted from, as the BIOS does not recognise them. You will have to plug in to the motherboard USB ports.
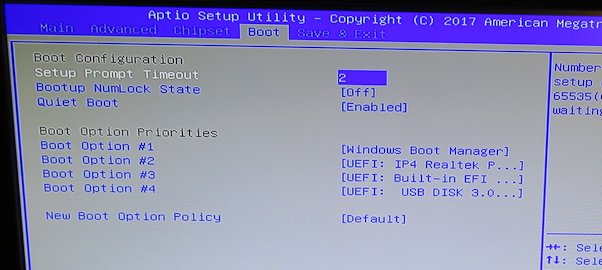
Again, the UI layout varies, but there will be some kind of boot-order selection, like this:
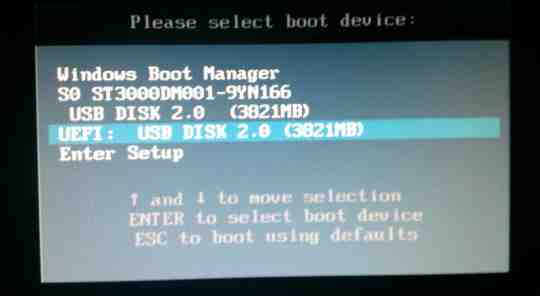
On the Mele PCG35, it looks like this:
...the Author's plugged-in USB-stick with Easy Linux is the one at the bottom. You have
to migrate it up to the top. Use the down-arrow key to highlight the
bottom Boot Option, then the "+" key to move it up, then the up-arrow
key, then "+" again, and so on -- you will see how to do it when you
actually do it.
The reason for doing this, is that it seems some UEFI firmwares need extra persuasion to make the boot-options setting "stick". Probably you won't have to do this.
There is another problem with some UEFI-firmware. If, at a future occasion, you bootup without the Linux drive plugged in, the UEFI-firmware "forgets" the setting, and moves the USB-stick down to the bottom of the boot-order. Meaning that, next time that you do bootup with the stick plugged-in, you have to go through the rigmarole of holding down the hot-key and and once again shuffle the USB-stick up to the top of the boot-order.
Very annoying! Not all UEFI-firmware has that problem though. The Author's desktop mid-tower has a HP motherboard with UEFI-firmware, that does remember. In fact, it is fairly generic -- any external USB-stick can be plugged in and it will boot, whereas there are some extremely annoying UEFI-firmwares that require the UEFI-Setup to be run for each specific USB-stick.
Now taking dual-booting to the next level...
Preparing to dual-boot an internally-installed Linux
If you download one of the major Linux distributions, such as Ubuntu, bootup the CD and the installer will hold your hand, lead you through installing Linux on the internal hard drive, and setup dual-booting with Windows.
Such a high-level installer makes it easy, but may make decisions that you might not like later on, or that you do not understand. The Author takes a more grass-roots approach, simple steps that you will understand, and you will know exactly what changes you are making to your computer.
The trend with modern cheap computers is to have a Solid State Drive (SSD), rather than the traditional rotating platter magnetic type of hard drive. SSDs may be much smaller -- the Mele has a 32GB SSD. So there isn't much room to fit another operating system!
A hard drive or SSD is split into what are called partitions, or volumes.
The C: drive is a partition. Ditto for D:, E: and so on. The problem is
that the entire drive is occupied, and you have to reduce the size of
one of these partitions, to make room for another one in which to
install Linux.
For Windows 7 and earlier, you can use the Linux Gparted utility to do this. Once you have booted up Easy Linux on a USB-stick, it has Gparted. It is a very nice GUI tool for creating and resizing partitions.
However, do not use Gparted with Windows 8 and 10. They might not work afterwards!
Fortunately, Windows 8 and 10 have a nice GUI drive partitioning tool of their own. Use this, and Windows will be happy. Here is how...
Right-click the "Start" menu at bottom-left of screen
    Choose "Disk Management"
This is what the Author sees on his Mele:
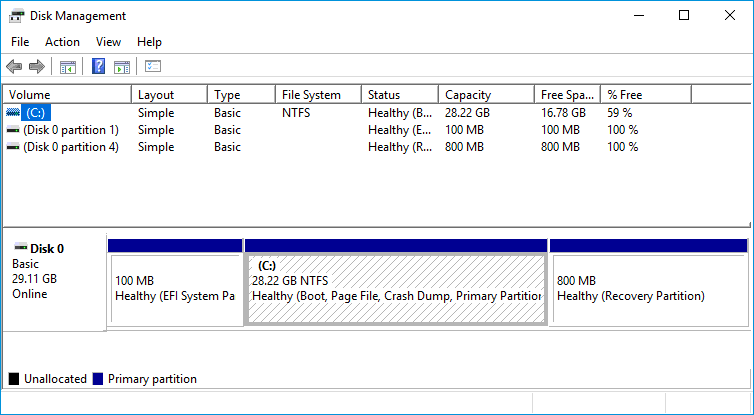
Well, the C: partition has some space, so:
Right-click on C: partition
    Choose "Shrink volume..."
        enter amount to shrink, in MB
In this case-study, the Author entered "8192", 8GB, which is plenty for Easy Linux. Now the window shows this:
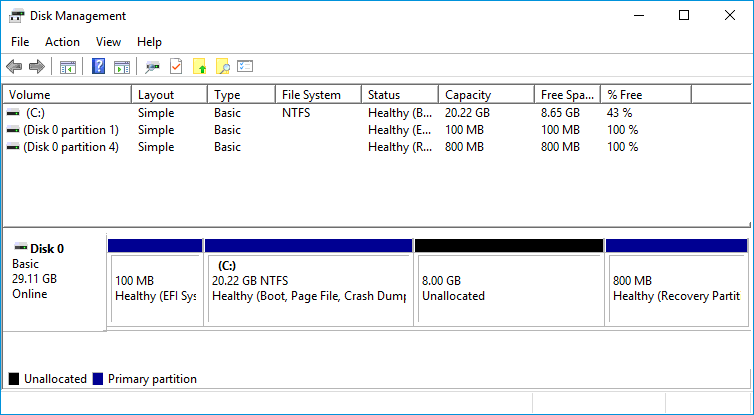
There is now a gap in the drive, where Easy Linux can be installed, but the Author is bringing this web page to a close.
To find out how to install Easy Linux into that gap, and dual-boot with Windows, will be the next tutorial. And here it is:
https://easyos.org/install/how-to-install-easyos-on-your-hard-drive.html
Post-amble
A final thought: the Author described how to create a 8GB gap in the drive. However, Easy can work with less, even 4GB, but below that you will hit too many restrictions, installing apps, etc.
Of, course, it
depends on the size of the internal drive. If you have a 500GB or bigger
hard drive, then go for it, create a nice big gap, 50GB or thereabouts.
Before rushing into creating a 8GB gap in the hard drive, on such a
tiny (32GB) SSD, think about other options. There is a problem with
cutting the Windows partition down to 20GB -- Microsoft has stated that
it will be inadequate for applying upgrades. The next tutorial suggests
one other option is to create a small 640MB gap only, for a "boot
partition", and use a plugged-in SD-card as the "working partition".
There is yet another option to consider. The Mele PCG35 Apo will
accept an additional internal 2.5inch or M.2 SATA hard drive or SSD.
Another tutorial explains how to install EasyOS to this extra drive,
which
is extremely easy to do, and has the great advantage that the original
SSD can be left untouched:
https://easyos.org/install/how-to-install-easyos-on-a-new-ssd.html
(c) Copyright Barry Kauler December 2018. All reproduction rights reserved.
The information on this page is given in good faith, however there is no guarantee nor liability accepted.
Tags: install