
How Easy works
Page originally written September 24, 2017
Partially updated: December 20, 2018
Major update: November 12, 2022
Updated: April 2, 2023. April 8, 2023
EasyOS is a "new paradigm" for a Linux distribution, a blend of the best ideas from Puppy and Quirky, and a fundamental rethink of the security, maintainability and ease-of-use.
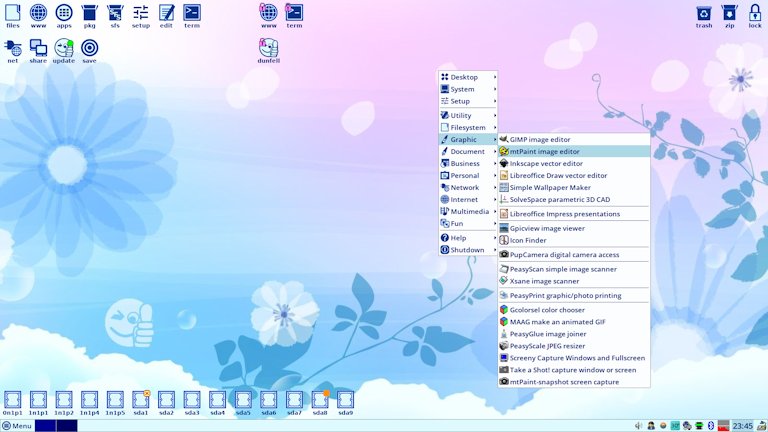
A good way to explain what Easy is all about, is to follow the user (that's you) experience, from downloading the deployed file, to installing and discovering it's features. To start, you would go to one of the websites hosting EasyOS and download it...Download
Unlike most other Linux distributions, Easy is not deployed as a CD/DVD disk (ISO file). Instead, Easy is an image for an entire drive, such as USB Flash stick, SD-card, HDD, or solid state disk (SSD).
One might immediately counter that ISO files can also be written
to Flash media -- yes, but that is not an installation -- the
distribution still has to be installed somewhere. With Easy, what
is written to the Flash media is the installation,
nothing more to be done. You can run Easy from external media
indefinitely, but there is also the option of installing to
internal drive.
The file you download is named easy-<version>-<architecture>.img, at the time of writing the latest is easy-5.2.1-amd64.img. You can find the latest here, courtesy of ibiblio:
https://distro.ibiblio.org/easyos/amd64/releases/kirkstone/
Or this mirror site, courtesy of NLUUG:
https://ftp.nluug.nl/os/Linux/distr/easyos/amd64/releases/kirkstone/
If all that you know is ISO files, then you might not know how to
write a drive-image file to a USB-stick. If that is the case, read this page:
https://easyos.org/install/how-to-install-easyos-on-a-new-ssd.html
It is really quite simple. You write the image file to a USB-stick,
then persuade the computer to boot from the USB-stick, bootup and you
have a desktop:
The file easy-5.2.1-amd64.img (or whatever version
you have downloaded) is an image file, that can be written to any
drive. Although it is only 825MB, at first bootup it will expand
to use the entire drive. So any drive, from 8GB upwards, is
suitable (although at least 16GB is recommended for ongoing usage).
Internal structure of the image file
Internally, the image file looks like this:
| Gap 1MiB |
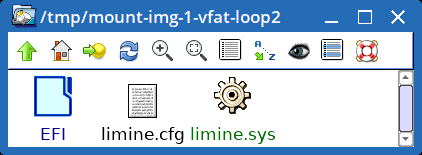
Boot-partition 7miB fat12 |
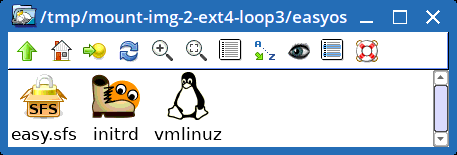
Working-partition 816MiB ext4 | Gap 1MiB |
If you are running EasyOS, you can just click on the file, and both partitions will be automatically mounted and opened in the file manager. This is the 7MiB vfat partition:
And the 816MiB ext4 partition:
If you are running some other Linux distribution, you will have to
calculate the offsets and mount the partitions manually, as described in
this page (near bottom of page):
https://easyos.org/user/how-to-update-easyos.html
Easy is extremely easy to install to an internal drive, as it consists of only those three files easy.sfs, initrd and vmlinuz,
and need only occupy one folder in a ext4 partition, leaving the rest
of the partition free for whatever else is already there, such as
another Linux distribution.
All that you have to do is create a folder in the ext4 partition of
the internal drive, copy those three files to it, and hey, installed!
There is one important detail of course; how to boot it. If you
already have GRUB or rEFInd or some other boot-loader installed, another
entry can be added to boot Easy.
Or, you can install the Limine boot-loader, which is very simple and
handles both UEFI and older legacy-BIOS computers. Easy has "Limine
bootloader installer", found in the "Setup" menu. Limine is introduced
here:
https://easyos.org/install/limine-bootloader.html
...be careful though, the Limine Installer is still a
work-in-progress. Perhaps try it on a computer that you don't mind if
something goes wrong.
Taking a closer look at the bootup process...
The Limine boot-loader
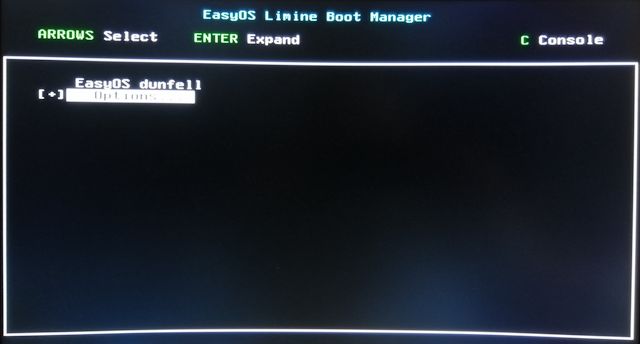
Any boot-loader can be used. The EasyOS image file comes ready-made
with Limine in the 7MiB vfat partition. The boot-loader is what the BIOS
or UEFI passes control to at bootup, and it usually contains a menu for
booting multiple OSs. When you boot the USB-stick, you will just see
the one entry, to boot EasyOS (for the example of the EasyOS Dunfell-series, that precedes the Kirkstone-series):
However, it is a boot-loader, and it can boot anything. See the file limine.cfg in above snapshot of the vfat partition; edit that to add entries for more OSs, Linux, BSD, Windows, whatever.
The same principle holds if you were to install Limine to the
internal drive. It would be required to read the Limine documentation to
know how to edit that file, but the "limine bootloader installer" in
EasyOS does a pretty good job of finding installed OSs and creating a limine.cfg for you -- though, as mentioned above, that is still a work-in-progress.
When the "EasyOS dunfell" entry is chosen, the boot-loader then loads the linux kernel vmlinuz and the file initrd.
Files initrd and easy.sfs
As already stated, the boot-loader first loads the Linux kernel, vmlinuz, then the "initial-ramfs", file initrd. File initrd is a complete tiny Linux operating system, whose main job is to setup the EasyOS desktop and switch to it.
At the very first bootup, it asks for a password. This is optional.
You could just press the ENTER key, no password; however, this is not
recommended. A password is recommended, anything you want that is easy
to remember, and it will encrypt some folders in the working-partition.
Extremely important in case your USB-stick is stolen!
The downside is that you have to enter the password at every bootup. The initrd also has an optional menu:
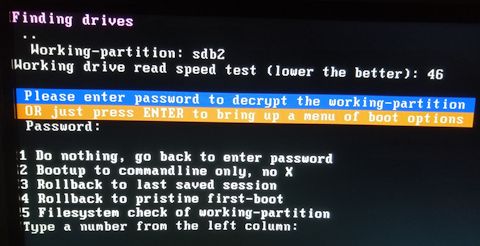
Normally, you would just type in the password, press ENTER, and the initrd would proceed to setup everything to switch to the desktop...
The initrd uses "aufs", which is a layered filesystem. Essentially
what this does is stack folders one on top of the other. This should
help to visualize what happens:
| / |
this is the abstraction, view at the top |
| RW layer folder |
this is the .session folder in the working-partition |
| RO layer folder |
easy.sfs is mounted on this folder |
where "RW" means read-write and "RO" means read-only.
File easy.sfs is the entire EasyOS. It is created with the "squashfs" filesystem. When mounted on a folder, you see the entire filesystem.
File easy.sfs is quite big, typically about 750MB. If, for example, it contains file /usr/share/doc/help.htm, that will appear at the "/" top -- except if there is another /usr/share/doc/help.htm in the RW layer, then the highest file is what you will see at "/".
That RW layer can also "erase" files and folders in a lower layer, or
rename them, by means of what are known as "whiteout files". That is
not a detail that need concern you -- if for example, from your
perspective at the the top "/", you delete /usr/share/doc/help.htm, it
will disappear. You don't need to know the wizardry underneath.
When you are running EasyOS, any changes that you make, such as
installing packages, or creating and editing files, will all go into
that RW layer.
The above visualization is, however, not correct in Easy's default mode at bootup. That .session folder is in the working-partition; however, to minimize writes to the Flash media, an indirection was introduced with Easy 4.4, visualized like this:
| / |
this is the abstraction, view at the top |
| RW layer folder |
this is a folder created in the RAM |
| RO layer folder |
easy.sfs is mounted on this folder |
Instead of writing directly to the .session folder in the Flash media, an ext2 filesystem is created in a "zram" device. Zram is compressed-RAM, in other words, everything in it is compressed, meaning that a lot more files can be stored in it than the actual size allotted to the zram in the RAM.
Ok, again, don't worry about the underlying wizardry, just see the
end result; the RW layer is now in RAM, so all writes are now only
happening in RAM, not to the Flash media.
However, we cannot get away from eventually having to write those files to the .session folder, and this can be done at any time you want, via the "save" icon on the desktop, or at shutdown.
Scroll back up to the snapshot of the desktop, you will see the "save" icon.
This indirection has another benefit; you may bootup, surf the web,
then shutdown, without saving and without leaving any trace of what you
did during that session.
The traditional mode, prior to easy 4.4, was to mount the .session folder directly on the RW layer, and you may go back to this if you wish -- it is offered as a choice via the "save" icon.
Direct write to the .session folder might be OK for a HDD or a high-quality SSD, where you don't mind the drive getting hammered with writes.
Anyway, getting back onto what the initrd does...
The layered-filesystem is setup, with that "/" on top, and at the
final step there is what is called a "switch_root", which transfers from
the tiny Linux OS in the initrd, onto the "/" top of the layered
filesystem.
This switch_root is magical. After it happens, suddenly this is what the filesystem looks like:
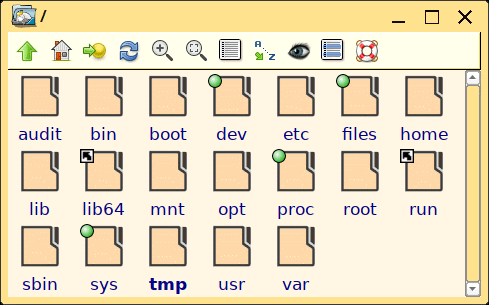
...what you are seeing here, is everything in easy.sfs, plus any new files created in the RW layer overlaid.
After that switch_root, the /sbin/init script executes, which ends up running the Xorg graphics server and the desktop is launched.
Looking inside initrd and easy.sfs
This section is for the technically-minded. If you would like to poke around inside those files, it is quite easy to do.
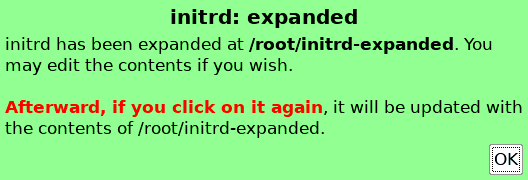
Running EasyOS, all that you need to do it click on those files, and they will be opened up. The initrd file can be opened up, you can edit anything inside it, then click again on the initrd file to update and "close" it. The easy.sfs file can also be opened, but it is RO.
Alright, go to the working-partition and click on initrd, there is a
dialog window asking if you want to open the file, you answer in the
affirmative, and a file manager window pops up:

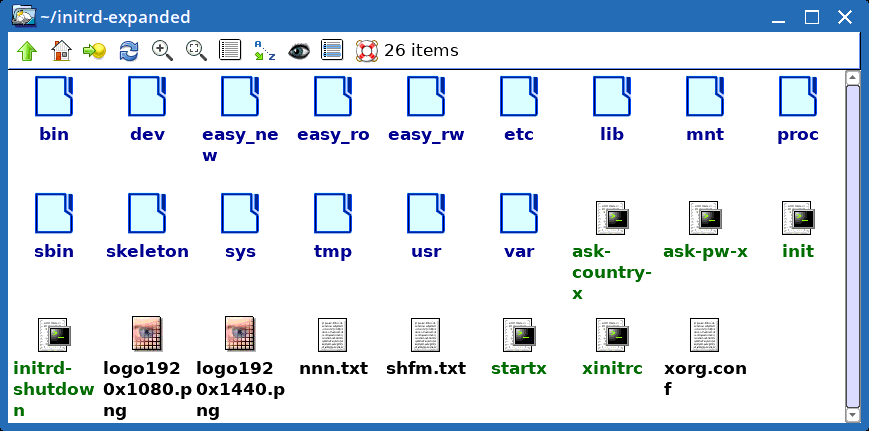
...some of the scripts shown above were experiments, not currently used. For example, startx and xinitrc started a tiny Xorg server in the initrd, for the purpose of running GUI apps prior to the switch_root.
And yes, you can also click on easy.sfs and view its
contents, read-only. If you scroll back up, you will see where it is, in
the working-partition, or more precisely at /mnt/${WKG_DEV}/${WKG_DIR}easy.sfs, which resolves to /mnt/sdb2/easyos/easy.sfs in the example.
Note, those variables WKG_DEV and WKG_DIR are defined in file /etc/rc.d/PUPSTATE
However, there is a gotcha, as after the first bootup, easy.sfs will no longer be there. At first bootup, the initrd creates some folders in the working-partition and easy.sfs is moved elsewhere:
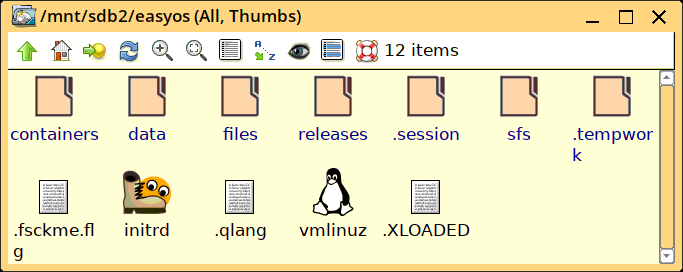
...the file manager has been set to show hidden files and folder, and you can see the .session folder. But no easy.sfs.
File easy.sfs has been moved and renamed, for the example of EasyOS 5.2.1 Kirkstone-series, to /mnt/sdb2/easyos/sfs/easyos/oe/kirkstone/easy_5.2.1_amd64.sfs
...as to why that is done, that is a whole other story, that will
require its own web page. In summary though, it is an organizational
thing, to have all SFS files under the sfs folder -- it greatly aids rollback, roll-forward, and usage of SFS files in containers.
How Easy works after switch_root
After the switch_root has occurred, Easy-proper is running. "How Easy works part-2" focuses on how Easy works, and usage, after the switch_root:
https://easyos.org/tech/how-easy-works-part-2.html
(c) Copyright Barry Kauler, December 2018,2022,2023, all reproduction rights reserved.
Disclaimer: Barry Kauler has provided these instructions in good faith; however, there is a disclaimer of all responsibility if something does go wrong. It shouldn't, but if you type in something incorrectly and wipe your C: drive, that is entirely your own responsibility.
Tags: tech